
How to Resize an Image for Free with Allrounder Image Tool
For content creators, bloggers, and social media managers, getting image dimensions just right is a constant challenge. Whether you’re optimizing for fast page loads, meeting Google Discover requirements, or fitting a social media profile, you need a quick, easy, and free solution. This guide will show you exactly how to resize an image using the Allrounder Image Tool in just a few simple steps.
Key Takeaways
- Completely Free: Resize, edit, and convert images without any cost or sign-ups.
- Bulk Processing: Upload and process up to 10 images at once to save time. (Source: Provided data)
- Preset Dimensions: Instantly select optimized sizes for platforms like Google Discover (1200×628), blogs, and social media. (Source: Provided data)
- Multiple Adjustments: Beyond resizing, you can apply effects, round corners, and change the output format.
- Easy Download: Download all your processed images neatly packaged in a single .ZIP file. (Source: Provided data)
Why Image Size Matters
Before we dive into the ‘how,’ let’s quickly cover the ‘why.’ Properly sized images are critical for:
- Website Speed: Large images slow down your site, hurting user experience and SEO.
- SEO Rankings: Search engines like Google favor fast-loading pages. Correct image sizes contribute directly to this.
- Platform Compliance: Social media, blogs, and news aggregators like Google Discover have specific dimension requirements for optimal display.
How to Resize an Image-A Step-by-Step Guide to Resizing with Allrounder Image Tool
Our tool is designed for simplicity and speed. Follow these five steps to get perfectly resized images every time.
Step 1: Upload Your Images
First, navigate to the Allrounder Image Tool. You’ll see the main interface with a clear “Upload” section.
- Click the UPLOAD FILES (MAX 10) button to select images from your computer. (Source: Provided data)
- Alternatively, you can drag and drop your files into the “Uploaded Images” area.
- You can add up to 10 images per batch. If you need to start over, simply click “CLEAR QUEUE.”
Once uploaded, you’ll see thumbnails of your images in the “Uploaded Images” box.
Ready to start? Upload your images and follow along!
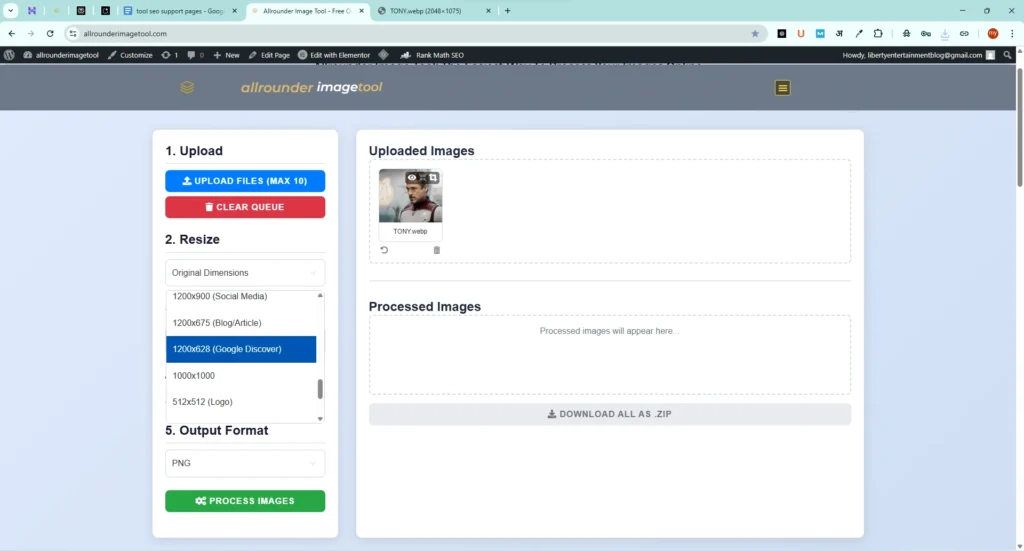
Step 2: Choose Your Resize Dimensions
This is where the magic happens. In the left-hand panel, locate the “2. Resize” dropdown menu.
- Click the dropdown, which defaults to “Original Dimensions.”
- A list of presets will appear. Based on the tool’s interface, you can choose from common sizes like (Source: Provided data):
- 1200×900 (Social Media)
- 1200×675 (Blog Article)
- 1200×628 (Google Discover)
- 1000×1000
- 512×512 (Logo)
Simply select the dimension that fits your needs. For this example, we’ll choose “1200×628 (Google Discover).”
Step 3: Apply Optional Edits
Allrounder Image Tool offers a few extra tweaks. Under the “Resize” option, you’ll find:
- Apply Effect: The dropdown defaults to “No Filter.” You can explore other effects if needed. (Source: Provided data)
- Round Corners: Use the slider to add rounded corners to your images, from 0% (sharp corners) upwards. (Source: Provided data)
For a simple resize, you can leave these at their default settings.
Step 4: Select Your Output Format
Need your image in a different format? The “5. Output Format” dropdown lets you choose your desired file type. The default option shown is PNG. (Source: Provided data)
Step 5: Process and Download Your Images
Once you’ve configured your settings, you’re ready to go.
- Click the green PROCESS IMAGES button at the bottom of the panel.
- The tool will quickly process your entire queue. The finished images will appear in the “Processed Images” box.
- Click the DOWNLOAD ALL AS .ZIP button to save all your newly resized images to your computer in one convenient file. (Source: Provided data)
That’s it! You’ve successfully resized your images without any complicated software or watermarks.
Frequently Asked Questions (FAQs)
Is the Allrounder Image Tool really free to use?
Yes, the tool is completely free. There are no hidden charges or sign-up requirements to use the features shown.
How many images can I resize at once?
You can upload and process a maximum of 10 images in a single batch. (Source: Provided data)
Can I resize an image for Google Discover?
Absolutely. The tool includes a dedicated preset for “1200×628 (Google Discover)” to make it easy to meet their requirements. (Source: Provided data)
What image formats can I export to?
The tool allows you to select an output format. The interface shows PNG as an available option. For other formats, please refer to the dropdown menu in the tool. (Source: Provided data)
Will my images have a watermark?
No, the tool provides clean, watermark-free images for you to use immediately.
Conclusion
Resizing images shouldn’t be a chore. With the Allrounder Image Tool, you can quickly and efficiently prepare your images for any platform, from your personal blog to Google Discover. By offering bulk processing, helpful presets, and a simple interface, it’s the perfect solution for anyone looking for a powerful and free online image resizer.